Tuesday, August 13, 2013
Latest British Police Car Siren circuit Schematic With explanation

This is the sound generator which will simulate British police car siren. The circuit is built using 2 pieces of timer IC 555 to generate sound frequency.
How the circuit work:
The 555 on the right is wired as an alarm sound generator and the second 555 timer on the left is a 1 Hz astable multivibrator. The output of the left timer is to modulate the frequency of the right timer. This process will cause the right timers frequency to alternate between 440Hz and 550Hz at a 1 Hz cyclic rate. The transistor 2N3055 is used to amplify the sound signal to the loudspeaker. This circuit should be nice for newbie hobbysts.
Tags: british police siren, electronic siren, police car siren, police siren, police siren circuit diagram,

Wednesday, June 12, 2013
UM3561 based 4 sound effect generator circuit schematic with explanation

This is a really simple sound effect generator based single sound generator chip UM3561. The UM3561 will generate four kinds of sound effects. The basic operation is that the UM3561 will generate the sound signal, then the signal delivered to 2N3706 (as speaker driver) to be amplified so you can hear the sound from a speaker.
Each switch position will generate the follofing sound effect:
- position 1 –> Police Siren
- position 2 –> Fire Engine Siren
- position 3 –> Ambulance Siren
- position 4 –> Machine Gun
Download the UM3561 datasheet for sound effect generator circuit reference:
» Download Link
Car Horn circuit schematic with explanation

The following diagram is the schematic diagram fo Car Horn, you may try this circuit for your car modification…

Components List:
| R1 = 68K R2 = 2K2 R3 = 56K R4 = 3K3 R5,R6 = 4K7 R7 = 10K Pot/trimpot | C1,C2 = 22nF C3,C5 = 100nF C4 = 1nF C6 = 220µF/25V IC1,IC2 = 7555 or TS555CN CMOS Timer ICs IC3 = TDA7052 SPKR = 8 Ohm |
Car Horn Circuit Description:
This car horn circuit reproduces the sound of contemporary vehicle horns. It had been mainly created for models and toys but, applying a high output energy audio amplifier IC, it could be implemented as well in further complicated projects.
Circuit operation
To receive a realistic automobile horn sound, two different tones mixed collectively are essential and the interval they’ll type ought to be a so known as minor third (in musical terms). This can be implemented by two 7555 CMos Timer ICs wired as astable multivibrators and generating a square wave of about 440Hz and 523Hz respectively. These frequencies ought to be quite precise, so the uncommon values necessary for your timing resistors are obtained by wiring two common worth resistors in series.
The square wave frequencies produced by IC1 (440Hz) and IC2 (523Hz) are mixed via R5 and R6 and shaped by C3, C4 and R7 in order to obtain a far more realistic tone. The resulting composite audio signal is ultimately sent for the audio power amplifier IC3 which, in turn, drives the loudspeaker. R7 needs to be adjusted to acquire a satisfactory output level.
Car Horn Circuit Notes:
- The loudspeaker may be of any form and diameter. Certainly it need to withstand a energy of at the least 1 Watt if the TDA7052 Audio power amplifier IC is chosen.
- The TDA7052 IC was used since it permits a minimum parts count and very excellent functionality. Wanting to make use of a distinct audio power amplifier IC, you are able to pick the much less effective but straightforward to find LM386 (see the Cuckoo-song Generator project).
- In any case, try a great sized device, as a way to receive finest outcomes.
- Needing a a lot more effective amplifier chip, it is possible to use the TDA2003 10W Car Radio Audio Amplifier IC or the TDA1516BQ 24W BTL Vehicle Radio Power Amplifier IC .
Source: RedCircuits
Wednesday, June 5, 2013
Conditioner Control Wiring Schematic Diagram Wiring Diagrams

Wiring Diagram Info Center Chaparral Boats Owners Club.

Enterprise Wiring Diagram Crop Small Jpg.

Air Conditioner Control Wiring Schematic Diagram Car Wiring Diagrams.

Kevin I Have Tried To Match Up The Boat Wiring On The Old Switch To.

Classic Whaler Boston Whaler Reference Dual Engine Dual Battery.

Suggested Wiring Diagram For Alternator Field Disconnect Circuit.

Topics Boat Wiring Diagram Electrical Wiring Diagram Toyota Wiring.

And The Air Line Hooked Up Time To Do Some Electrical Wiring.

1995 Chevrolet Tahoe Blazer Electrical Wiring Diagram Circuit.

An Engaged In Boat Boat Ammeter Partsboat Meter Wiring Diagram.
Friday, April 5, 2013
Circuit Detector and Disconnecting Over Voltage Schematic
The circuit in this figure is protecting the circuit and the system with power supplies that may exceed safe limits. One example is small consumer products that use external ac adapters; its easy to mistakenly plug in the wrong adapter. Another example is a portable system that uses a rechargeable battery pack. If the battery pack is absent or fails to open during recharging, a high-compliance charger can deliver excessive voltages to the system.
The circuit works using LM4041 adjustable shunt-voltage regulator as a voltage detector. When it operates as a reference, the LM4041 develops a voltage across its positive and negative terminals. This signal forces the voltage across R1 to equal 1.24V. In this circuit, however, R3 prevents this servo action. With R3 in the circuit, VG is near ground when the voltage across R1 is less than 1.24V, and VG is approximately 1V below the positive rail when the voltage across R1 is greater than 1.24V. You can, therefore, set a threshold voltage by selecting appropriate values of R1 and R2. When the supply voltage exceeds the threshold, VG goes high, thereby turning off Q1 and removing power from the load. Select R1 and R2 according to:


It where VSHUTOFF is the supply voltage that causes shutoff. With the values shown, the circuit removes power from the load when the supply voltage reaches approximately 6V. R4 provides hysteresis to prevent chattering when the supply voltage is near the shutoff value. IC1 can accommodate shutoff voltages as high as 10V; clamping IC1s supply voltage with another inexpensive shunt reference or zener diode (across the positive and negative terminals) allows higher maximum shutoff voltages. Maximum supply voltage with the components is approximately 50V.
Circuit Board Schematic Diagram Layoutcircuit Schematic

X3 Circuit Board Schematic Diagram Pcb Layout Circuit Schematic.

Craetive Zii Egg Connector Pinout And Wiring Pinoutsguide Com.

Usb Flash Memory Flash History And Specifications What Is Usb.

Cable Wiring Diagram Keyboard Ps 2 Pinout The Pc S.

Hssdc Diagram And Pinout Db9 Diagram And Pinout Media Interface.

Toyota Fj Cruiser Brake Switch Wiring Diagram Circuit Schematic.

Sony Ericsson Experia Ray Charger Cable Connection Diagram.

Figure 4 Wiring Diagram For An Ethernet Crossover Cable.

Usb Wiring Connection.

Rs232 Serial To Usb Converter Cable Schematic Gif.
Esteem Cooling Circuit Wiring Diagramcircuit Schematic

Highlander Hybrid Headlamp Assembly Parts Diagram Circuit Schematic.

Fuel Pump Relay Wiring Diagram.

Esteem Cooling Fan Circuit And Wiring Diagram Circuit Schematic.

Wiring Diagram Here Free Download Pdf File Source Www.

Chevrolet Monte Carlo Wiring Diagram And Electrical Schematics 1997.

Yaris Blower Motor Circuit And Wiring Diagram Circuit Schematic.

Ru Find Also Other Toyota Wiring Diagram You Might Be Looking For.

System Circuit And Wiring Diagram 98 02 Circuit Schematic.

Gp1200 Starter Motor Exploded Diagram And Parts Circuit Schematic.

Toyota Hiace Wiring Diagram And Electrical System 2006 Circuit.
Monday, April 1, 2013
1500W Stereo Power Amplifier Schematic
 |
| Click Image to view larger |
Wiring Diagram 1947 Harley Davidsoncircuit Schematic

Typical 7 Way Trailer Wiring Diagram Circuit Schematic.

Wiring Diagram For 1947 Harley Davidson Circuit Schematic.

250 And 525 Sx Mxc Exc Electrical System And Wiring Diagram Here.

Wiring Diagram Here Free Download Pdf File From Jeep Justanswer.

Wiring Diagram For 2002 Bajaj Legend Circuit Schematic.
Chevrolet Monte Carlo Wiring Diagram And Electrical Schematics 1997.

Wiring Diagram.

The Following Schematic Shows Typical Wiring Diagram Of The 1999.
Ru Find Also Other Toyota Wiring Diagram You Might Be Looking For.

Fiat Punto Fuse Diagram 240sx Fuel Pump Wiring Diagram Le2jetronic.
Fire Stick Schematic Diagram
This article will show you how to build your own version of the Fire-Stick infrared remote control system. The LITEON infrared receiver modules originally designed-in to the Fire-Stick have been discontinued, and forced us to re-design the original circuit boards.
The transmitter schematics.
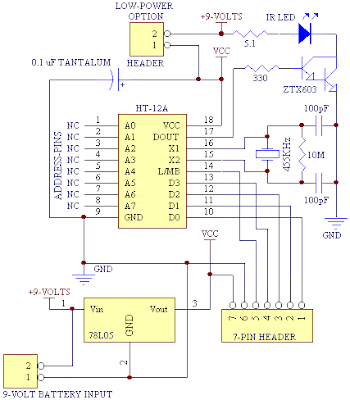

The principle works of the fire stick is the heart of the Fire-Stick is the Holtek HT-12A encoder IC. This handy little encoder was specifically designed for infrared transmission media, and internally generates the 38 KHz carrier frequency for each data transmission.
The data pins of the HT-12A act as both data input pins & transmit enable inputs. Unlike most ordinary encoder ICs with separate transmit enable pins, and data input pins, the HT-12A uses the data input pins to take care of both input functions.
By pulling one of the data pins to ground, the transmission cycle is started. As with most encoders, a pre-determined sequence of events takes place during each separate transmission cycle. The HT-12A however, has a few internal extras that make it pretty flexible. Notice from the flow chart below that the logic state of the L/MB pin is checked prior to finishing the transmission cycle and returning to standby mode.
To L/MB or not to L/MB:
The L/MB pin serves as the Latch/Momentary selection pin, and determines whether the HT-12A will end each transmission cycle by sending the exact logic state present on each data pin, or end the transmission cycle by sending logic "1" 7 times as the data. If L/MB is left floating, (not connected), the transmission will send only the actual logic values present on each of the HT-12A data input pins. This logic value will be latched onto the output pins of the HT-12D decoder IC until you send another transmission with different data.
The HT-12D decoder IC used on the Fire-Stick receiver normally operates in latched mode. Without the added feature of the L/MB function of the HT-12A encoder IC, the receiver would normally operate in latched mode. Operation of the transmitter causes corresponding data pins of the HT-12D decoder IC to latch at logic 0, or logic 1, depending on the actual logic values present on the HT-12A data input pins, and the state of the L/MB pin.
Using the L/MB option of the HT-12A to select momentary operation of the HT-12D will allow the receiver output pins to be momentarily pulsed low, and then return to logic 1 once the transmission ends, and you release the HT-12A data input pin from ground.
The logic state of all address pins on both the encoder & decoder ICs must be 100% identical or no change will be seen on the decoder output pins. The address pins allow for a certain degree of security, and are beneficial if a similar transmitter will be operated within range of your receiver. This simple method also provides an efficient means of controlling multiple receivers in close proximity to one another with a single transmitter.
With different addresses on multiple receivers you need only adjust the address of the transmitter to match that of each receiver to gain control of that receiver. With 8 address pins, A0 - A7, a total of 256 possible address combinations are possible. This means you can control up to 256 separate receivers with a single transmitter, or have up to 256 possible security addresses for a transmitter/receiver combination.
Friday, March 29, 2013
BMW E12 L Jetronic Fuel Injection Systems Schematic Diagram

The L-Jetronic System – Control Unit (ECU) takes sensor information such as AFM flow and temperature, Engine RPM (from ignition), Warm up information (from coolant temperature sensor), Throttle mode (idle and WOT switches), O2 sensor in Lambda systems. Then calculates opening duration of injectors. This ‘map’ is hardwired into system (there’s no chip available to modify).
Get detail information about BMW E12 L-Jetronic Fuel Injection Systems Schematic Diagram here – free download PDF file.