Friday, January 10, 2014
Solar Charger Circuit Project Using Transistors


Friday, December 27, 2013
Burglar Alarm With Timed Shutoff Circuit Diagram

Wednesday, December 25, 2013
Memory Save on Power down Circuit Diagram
 /
/Monday, December 23, 2013
Build a 5 Zone alarm Circuit Diagram

Friday, December 20, 2013
Build a 13KV High voltage Power supply Circuit Diagram
13KV High voltage Power supply Circuit Diagram

Saturday, August 31, 2013
Metal Detector Circuit

control VR1 and the output is fed to an 8-ohm/1W speaker. The inductor L1 can be constructed using 15 turns of 25SWG wire on a 10cm (4-inch) diameter air-core former and then cementing it with insulating varnish. For proper operation of the circuit it is critical that frequencies of both the oscillators are the same so as to obtain zero beat in the absence of any metal in the near vicinity of the circuit. The alignment of oscillator 2 (to match oscillator 1 frequency) can be done with the help of trimmer capacitor VC1. When the two frequencies are equal, the beat frequency is zero, i.e. beat frquency=Fx-Fy=0, and thus there is no sound from the loudspeaker. When search coil L1 passes over metal, the metal changes its inductance, thereby changing the second oscillator’s frequency. So now Fx-Fy is not zero and the loudspeaker sounds. Thus one is able to detect presence of metal.
Source: http://www.electronics-lab.com
Tuesday, August 13, 2013
Latest British Police Car Siren circuit Schematic With explanation

This is the sound generator which will simulate British police car siren. The circuit is built using 2 pieces of timer IC 555 to generate sound frequency.
How the circuit work:
The 555 on the right is wired as an alarm sound generator and the second 555 timer on the left is a 1 Hz astable multivibrator. The output of the left timer is to modulate the frequency of the right timer. This process will cause the right timers frequency to alternate between 440Hz and 550Hz at a 1 Hz cyclic rate. The transistor 2N3055 is used to amplify the sound signal to the loudspeaker. This circuit should be nice for newbie hobbysts.
Tags: british police siren, electronic siren, police car siren, police siren, police siren circuit diagram,
Saturday, August 3, 2013
Simple Audio Clipper Circuit Diagram

Thursday, August 1, 2013
Simple Ni cad charger Circuit Diagram
Simple Ni-cad charger Circuit Diagram

Wednesday, June 12, 2013
UM3561 based 4 sound effect generator circuit schematic with explanation

This is a really simple sound effect generator based single sound generator chip UM3561. The UM3561 will generate four kinds of sound effects. The basic operation is that the UM3561 will generate the sound signal, then the signal delivered to 2N3706 (as speaker driver) to be amplified so you can hear the sound from a speaker.
Each switch position will generate the follofing sound effect:
- position 1 –> Police Siren
- position 2 –> Fire Engine Siren
- position 3 –> Ambulance Siren
- position 4 –> Machine Gun
Download the UM3561 datasheet for sound effect generator circuit reference:
» Download Link
Car Horn circuit schematic with explanation

The following diagram is the schematic diagram fo Car Horn, you may try this circuit for your car modification…

Components List:
| R1 = 68K R2 = 2K2 R3 = 56K R4 = 3K3 R5,R6 = 4K7 R7 = 10K Pot/trimpot | C1,C2 = 22nF C3,C5 = 100nF C4 = 1nF C6 = 220µF/25V IC1,IC2 = 7555 or TS555CN CMOS Timer ICs IC3 = TDA7052 SPKR = 8 Ohm |
Car Horn Circuit Description:
This car horn circuit reproduces the sound of contemporary vehicle horns. It had been mainly created for models and toys but, applying a high output energy audio amplifier IC, it could be implemented as well in further complicated projects.
Circuit operation
To receive a realistic automobile horn sound, two different tones mixed collectively are essential and the interval they’ll type ought to be a so known as minor third (in musical terms). This can be implemented by two 7555 CMos Timer ICs wired as astable multivibrators and generating a square wave of about 440Hz and 523Hz respectively. These frequencies ought to be quite precise, so the uncommon values necessary for your timing resistors are obtained by wiring two common worth resistors in series.
The square wave frequencies produced by IC1 (440Hz) and IC2 (523Hz) are mixed via R5 and R6 and shaped by C3, C4 and R7 in order to obtain a far more realistic tone. The resulting composite audio signal is ultimately sent for the audio power amplifier IC3 which, in turn, drives the loudspeaker. R7 needs to be adjusted to acquire a satisfactory output level.
Car Horn Circuit Notes:
- The loudspeaker may be of any form and diameter. Certainly it need to withstand a energy of at the least 1 Watt if the TDA7052 Audio power amplifier IC is chosen.
- The TDA7052 IC was used since it permits a minimum parts count and very excellent functionality. Wanting to make use of a distinct audio power amplifier IC, you are able to pick the much less effective but straightforward to find LM386 (see the Cuckoo-song Generator project).
- In any case, try a great sized device, as a way to receive finest outcomes.
- Needing a a lot more effective amplifier chip, it is possible to use the TDA2003 10W Car Radio Audio Amplifier IC or the TDA1516BQ 24W BTL Vehicle Radio Power Amplifier IC .
Source: RedCircuits
10 Amp 13 8 Volt Power Supply Circuit
10 Amp 13.8 Volt Power Supply Parts List :
R1 1.5K ¼ Watt Resistor (optional, tie pins 6 & 5 of IC1 together if not used.)
R2,R3 0.1 Ohm 10 Watt Resistor (Tech America 900-1002)
R4 270 Ohm ¼ Watt Resistor
R5 680 Ohm ¼ Watt Resistor
R6,R7 0.15 Ohm 10 Watt Resistor (Tech America 900-1006)
R8 2.7K ¼ Watt Resistor
R9 1K Trimmer Potentiometer (RS271-280)
R10 3.3K ¼ Watt Resistor
C1,C2,C3,C4 4700 Microfarad Electrolytic Capacitor 35 Volt (observe polarity)
C5 100 Picofarad Ceramic Disk Capacitor
C6 1000 Microfarad Electrolytic Capacitor 25 Volt (observe polarity)
IC1 LM723 (RS276-1740) Voltage Regulator IC. Socket is recommended.
Q1 TIP3055T (RS276-2020) NPN Transistor (TO-220 Heat Sink Required)
Q2,Q3 2N3055 (RS276-2041) NPN Transistor (Large TO-3 Heat Sink Required)
S1 Any SPST Toggle Switch
F1 3 Amp Fast Blow Fuse
D1-D4 Full Wave Bridge Rectifier (RS276-1185)
T1 18 Volt, 10 Amp Transformer Hammond #165S18 (Digi-Key HM538-ND)
10 Amp 13.8 Volt Power Supply Circuit

Thursday, May 30, 2013
Illustrates 1994 Honda Accord Lamps Circuit Wiring Diagram

S102002 2003 S104001 4003 Basic Wiring Diagram Basic Wiring Diagram.

Corolla Alternator Wiring Diagram Externally Regulated Jpg.

Wiring Diagram 1969 Camaro Wiring Diagram 1989 Camaro Wiring Diagram.

Wiring Diagram.

Solar Battery Wiring Diagram Green Solar And Wind Power.

Illustrates The 1994 Honda Accord Fog Lamps Circuit Wiring Diagram.

Wiring Diagram Anti Lock Brake For Mazda B4000 2002.

Wiring Diagram.

1988 Honda Civic Tail Light Wiring Diagram.

Wiring Diagram Symbols.
Wednesday, May 29, 2013
Good Quality Sound Amplifier Circuit
With a single IC capitalize MPC576H and several other supporting components you have to make this amplifier circuit. Voltage at least 9 Volt and 24 Volt Max. Output Power 3.5 Watts with 8 Ohm impedance.
 |
| Good Quality Sound Amplifier Circuit |
Friday, May 17, 2013
12 Volt car Battery Monitor Circuit
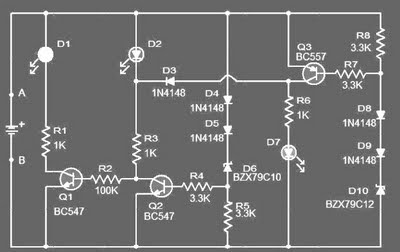 12 Volt car Battery Monitor Circuit
When the battery voltage is above 13.5 V, the transistor Q3 is on and the LED D3 will be bright. The 12 volt control can be connected between terminals A and B and for the convenience of using LEDs of different colors.
List component of Monitor status battery 12 volt
-R1,R3,R6: 1k 1/4W Resistance
-R2: 100K 1/4W Resistance
-R4,R5,R7,R8: 3.3K 1/4W Resistance
-D1: LED red color
-D2: LED yellow color
-d7: LED green COLOR
-D2,D4,D5,D8,D9: 1N4148 diode 1 ampere
-D6: BZX79C10 diode Zener 10 volt
-D10: BZX79C12 diode Zener 12 volt
-Q1,Q2: BC547 NPN transistor
-Q3: BC557 PNP transistor
Tuesday, May 14, 2013
H V SF6 Circuit Breaker Spring Mechanism
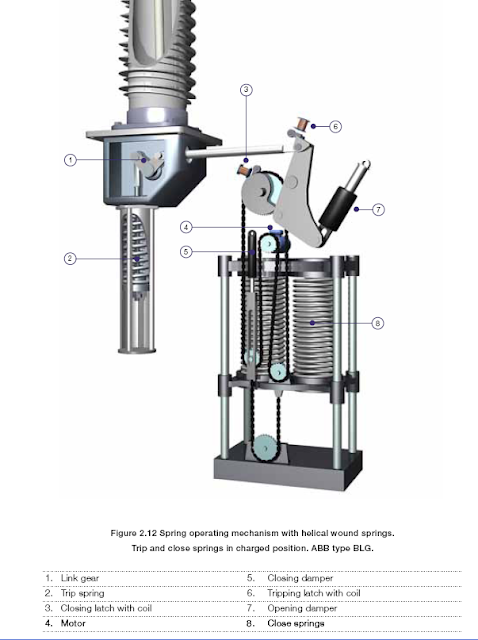 Here below is given a mechanism for a high voltage SF6 circuit breaker .
Simple Tone generator Circuit

This is simple tone generator circuit.You can use this one for your
alarm circuits,bugler alarms etc.Here I have used Common Ic NE 555.you
can use this for various things Try to make new thing.
QRP antenna tuner circuit

The output of the transmitter is given to the input of the tuner( connector BNC1). The output of the tuner(connector BNC2) must be connected to antenna.Then adjust the L1 and C1 to obtain the maximum transmission power.The transmission power can be checked using a SWR meter.
Notes.
* Assemble the circuit on a goos quality PCB or common board.
* If the matching is not satisfactory then change the values of L1,C1,C2&C3 to the next close value and tune again.
* Proper tuning requires some trial and error.
* The circuit can be enclosed in an aluminum casing for better performance.
Saturday, April 13, 2013
Temperature warning indicator circuit

R1= 820 ohm
R2-3= 1Kohm
C1= 220uF 16V
TR1= 2.2Kohm Trimmer D1= 5.6V 0.5W Zener
D2-3= 1N4148
Q1-2= BC550C
TH1= Thermistor 10Kohm at 25° C
K1= 6V 200 ohm Relay
BZ1= Buzzer
S1= 1×2 Switch
BATT= Battery 9V or exterior supply
This circuit is designed not only putting a become aware ofion of high temperatures, however can also be modified to be set on the detection of low temperatures in some houses. It can be utilized for refrigeration, walk-in fridge or freezer and other environments which can be sensitive to temperature. Some built-in circuits excessive-temperature alarm modules might be used in motor autos to the occupation through which the temperature component experiences a temperature very dangerous in the inside of a motor automobile, and motivates the employment sensor realizes the presence or resolve the absence of an occupant. In the absence of the inhabitants, the sensor is that after a length during which an audible alarm is activated to offer the attention to the motor car within the presence of an occupant. This kind of alarm will be reset with a key.
Friday, April 12, 2013
Infra Red IR LED Flood Light Circuit Diagram
Infra Red (IR) LED Flood Light Circuit Diagram
The adjoining design shows a simple IR flood light circuit diagram for IR illumination applications.
The 4049 section is the basic voltage doubler circuit which effectively boosts the 9 V supply to a level of around 15 V which further becomes the suypply voltage for the next 555 pulse modulator section.
The voltage is suitably pulsed as per the settings of P1 and P2 for driving the associated IR LEDs.
The main feature of this circuit is that it utilizes just a single PP3 9 volt battery and yet is able to provide lights (IR) at dazzling levels.
